Installation
Installing DRIFT has a few steps that need to be completed.
- Wiring the module so it can receive MAVLink from the Flight Controller.
- Configure the Flight Controller to provide MAVLink telemetry to the module.
- Flashing the module firmware.
- Configure the module to your needs.
- Test the module for correct operation.
Hardware
To make DRIFT work the only connection needed is one UART through which the Flight Controller sends MAVLink messages. These are used to determine the position and state of the drone to broadcast.
At the moment we only support ESP32-C3 Mini modules in our releases. If you are familiar with PlatformIO you can modify the configuration to build for other modules and test. Pull Requests are always welcome.
ESP32-C3 Mini
We assume you are using a development module which has all the pins needed for booting the module, wired accordingly.
If you want to use a bare-bones module directly you have to populate a few more pins to make it work. For more details you can consult the datasheet section Peripheral Schematics.
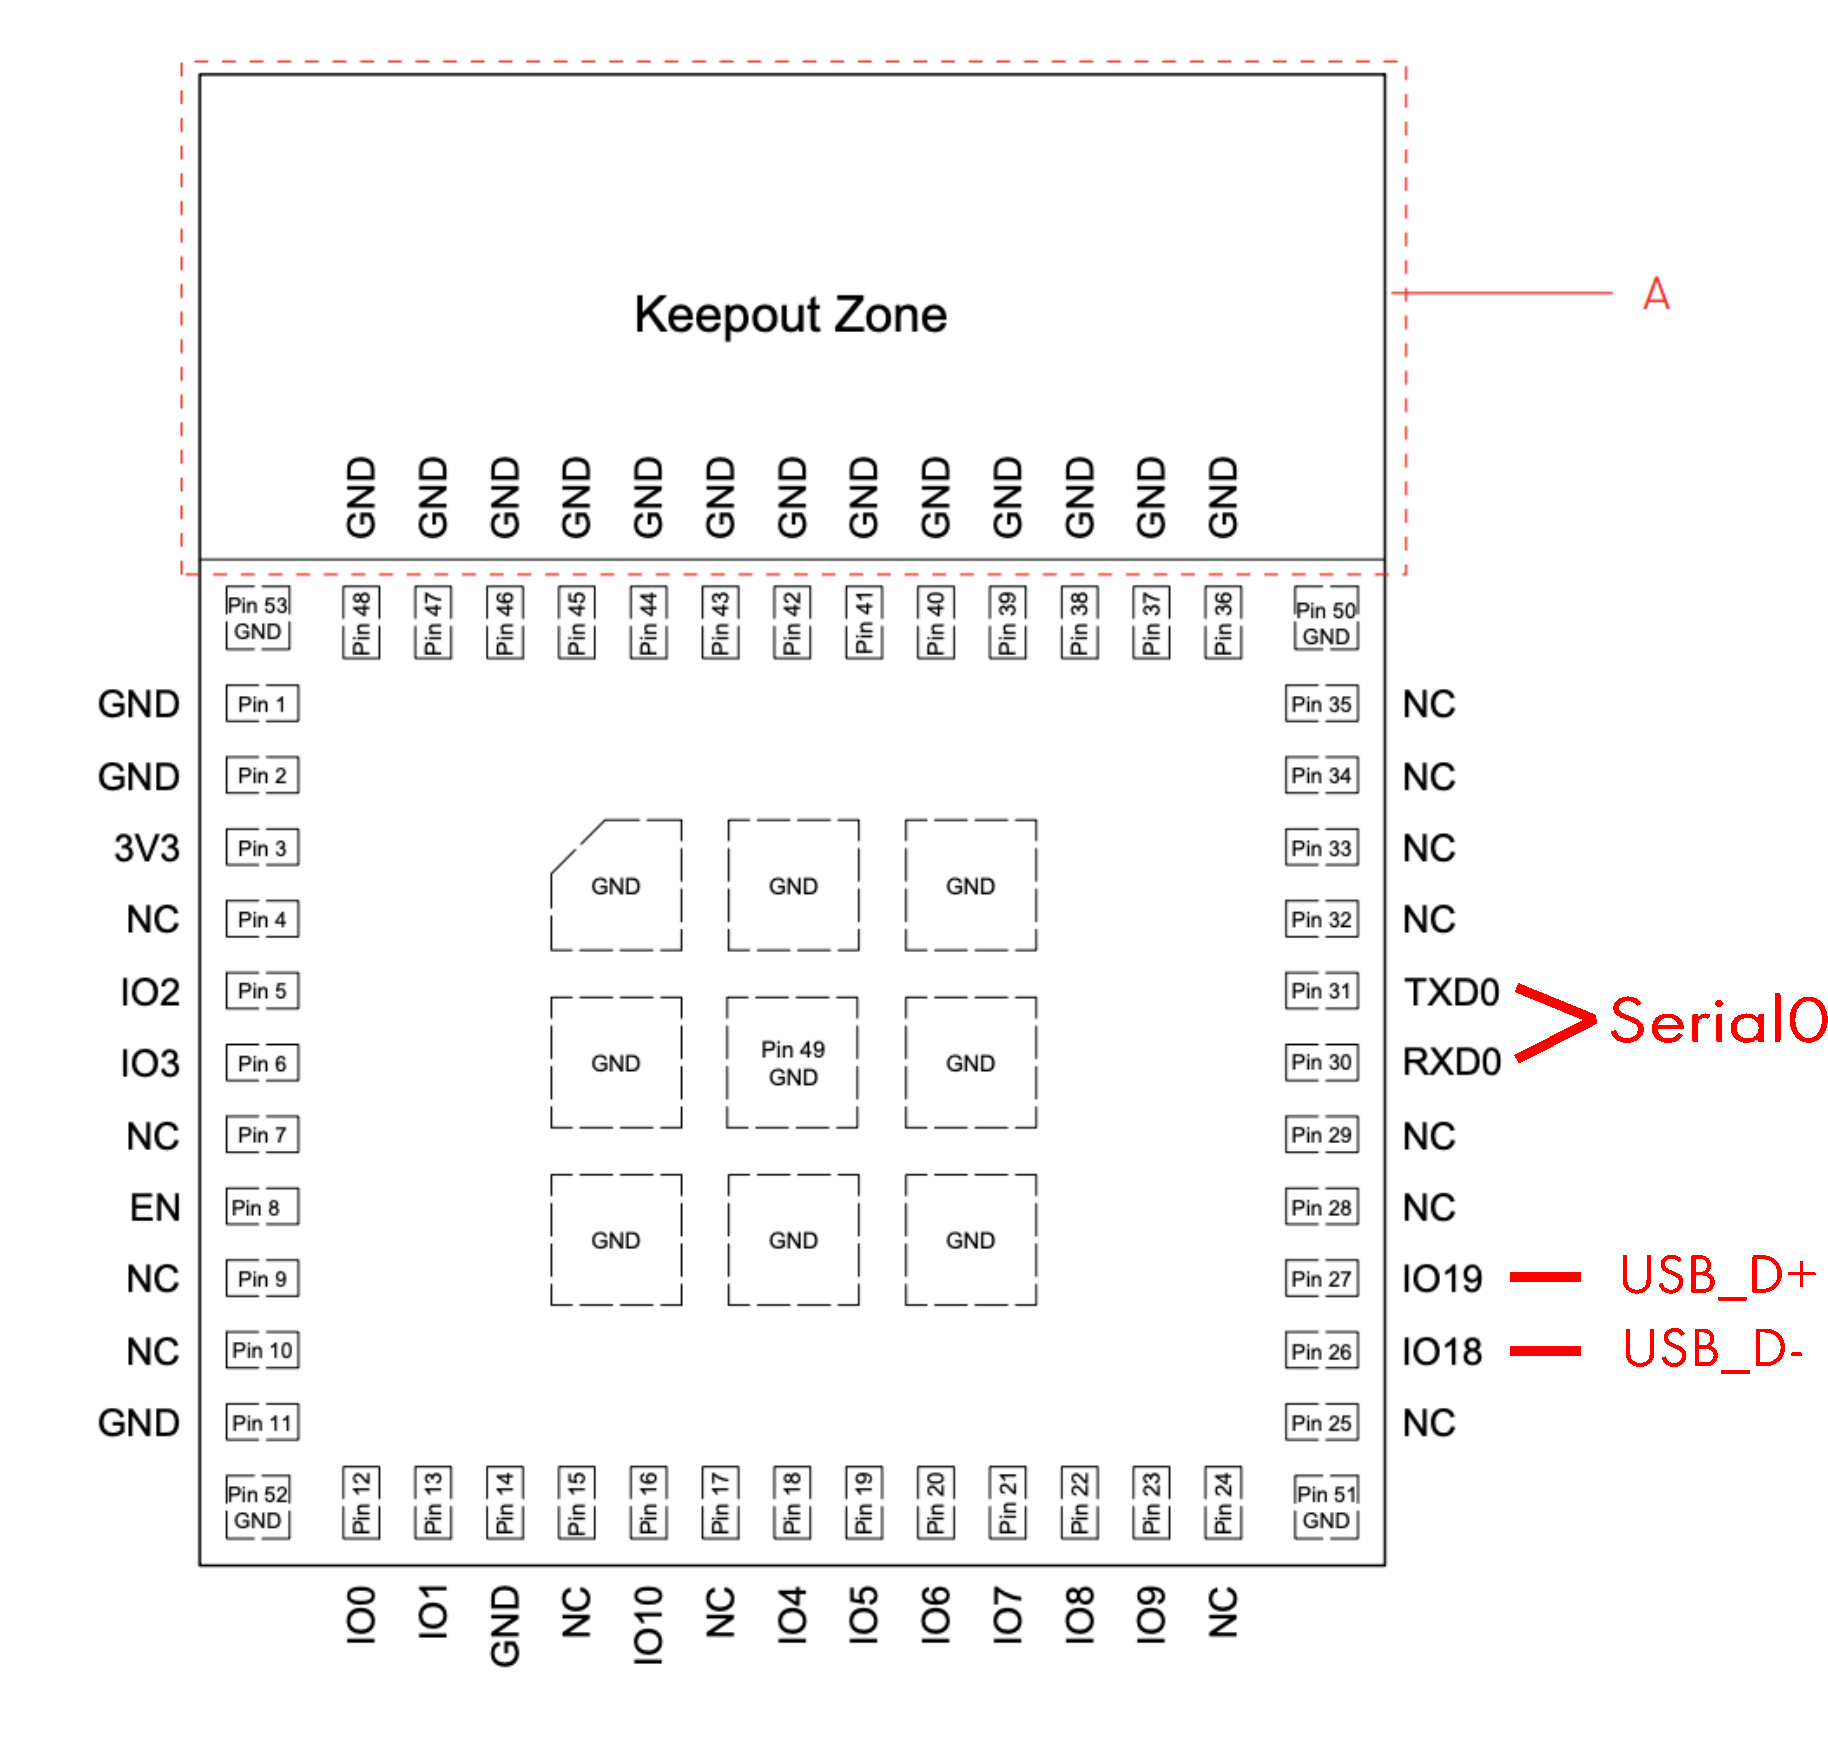
You can choose to flash via another interface, by default we assume you are using the built-in USB interface. This leaves the first serial line to be used for ingesting MAVLink messages from the flight controller.
Pinout
| Pin | Name | Function |
|---|---|---|
| 26 | IO18 | USB_D- for Programming and Debug |
| 27 | IO19 | USB_D+ for Programming and Debug |
| 30 | RXD0 | MAVLink input Serial0 |
| 31 | TXD0 | MAVLink output Serial0 |
Flight Controller
Once you have connected Serial0 to a UART available on your Flight Controller, you can start with your software configuration.
Betaflight
Hard- VS Soft-Serial
DRIFT can consume MAVLink messages from Betaflight both on hard- as well as soft-serial ports. If you have a hard-serial available, this is preferable for reliability.
If you would like to use a soft-serial port please consult the Betaflight documentation on how to set it up before proceeding.
MAVLink Firmware Support
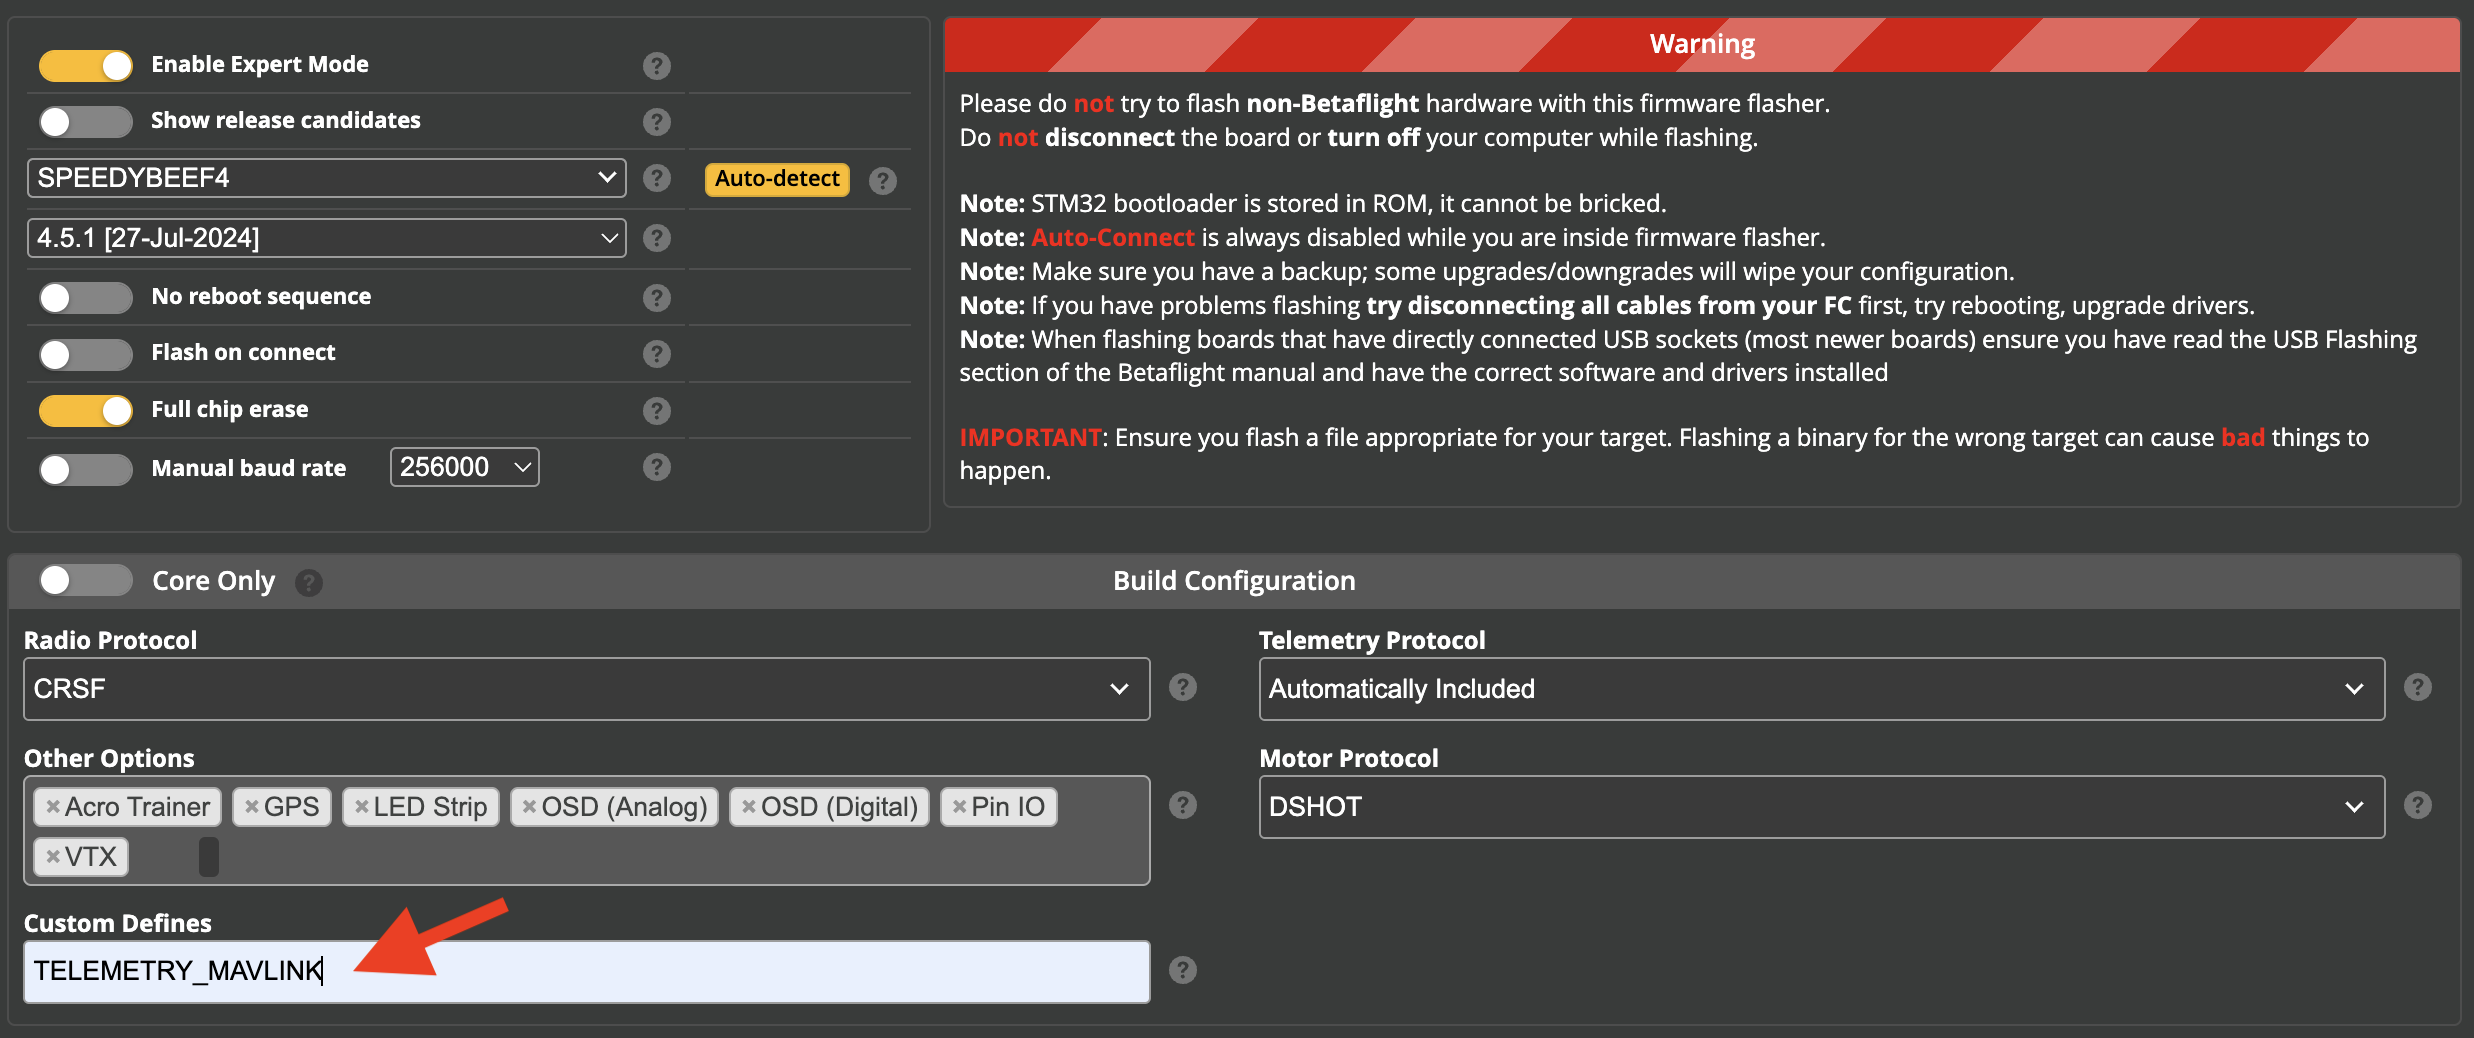
Depending on your current firmware version and build you might not have MAVLink support included. With Cloud Build in Betaflight this is a very easy fix. Use the Firmware Flasher in your Betaflight Configurator as you normally would, flashing a new firmware and simply add the Custom Define TELEMETRY_MAVLINK.
MAVLink Config
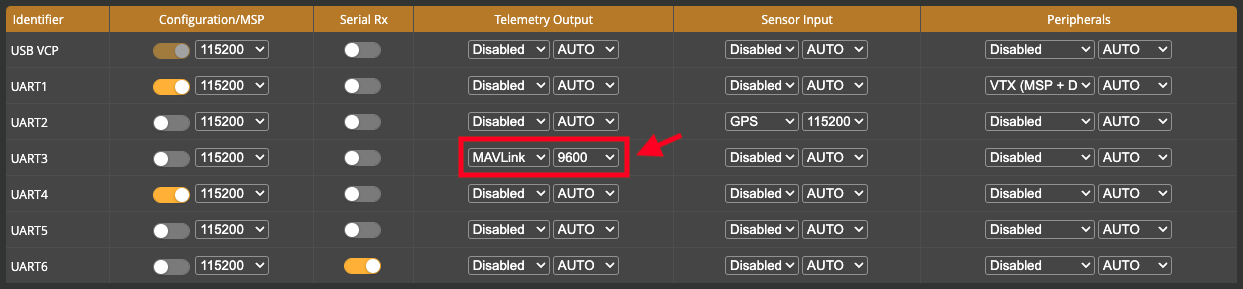
To make MAVLink work you only have to configure the relevant UART in your Ports tab to send MAVLink telemetry at 9600 baud.
Firmware
Firmware files are provided as part of each release as Assets.
Serial
For serial upload you can use esptool either locally or through your browser with web serial support.
Web
- Open https://espressif.github.io/esptool-js/ in your browser.
- In the
Programsection set the baud rate to460800. - Press
Connectand choose the serial port your module is connected at. - Set the
Flash Addressto0x0and choose the firmware file ending in-full.bin. - Press
Programand let the process finish. - Reset your board.
Local
esptool.py write_flash 0x0 firmware-esp32_c3_devkit-RELEASE-full.bin
Once finished reset your board.
OTA
Over-the-Air (OTA) updates are only available after you have installed DRIFT on a module once.
To perform such an update simply connect to the WiFi AP of your module (default SSID is DRIFT_<chipid>). Once connected open the web page at http://drift.local/update.
Upload the firmware file ending in -ota.bin for your module and wait for the process to finish. It should automatically reset and boot into the updated firmware.
Configure
- Connect to your module via WiFi (default SSID is
DRIFT_<chipid>). - Open a browser and go to the dashboard at http://drift.local.
- All options for configuring the module are found in the
Configtab:
| Option | Details |
|---|---|
| WiFi SSID | Network name of the module’s own access point. |
| WiFi Password | Leave empty for an open access point, otherwise WPA2 with a minimum of 8 characters. |
| Unmanned Aircraft ID | The serial number of your aircraft (max. 20 characters). |
| Unmanned Aircraft Description | Free text describing your aircraft, e.g. make and model (max. 23 characters). |
| Operator ID | Your operator registration ID, where your regulator assigns one (max. 20 characters). |
| Bluetooth 5 Long Range | Transport switch, see Broadcasting. Default: on. |
| Wi-Fi Beacon | Transport switch, see Broadcasting. Default: on. |
| Wi-Fi NAN | Transport switch, see Broadcasting. Default: off. |
The default SSID is derived from the unique chip ID of your module.
Saving the configuration makes the module reboot itself to apply the new settings.
Testing
- Connect to your module via WiFi (default SSID is
DRIFT_<chipid>). - Open a browser and go to the dashboard at http://drift.local.
- The sidebar shows three health indicators, which stay visible whichever tab you are on:
- Connection — the health of the link between dashboard and module: green Connected with the age of the last update, orange Connecting / No data (the link is up, but no updates arrive — a wedged connection is reported instead of the display silently freezing), or red Disconnected.
- Telemetry — green once the flight controller is sending MAVLink messages.
- GNSS — green once a valid position fix is available. Make sure your drone has a proper 3D position fix in your Flight Controller.
Both device indicators start orange rather than red: until the first update arrives the module has not reported anything either way. On a narrow screen the sidebar folds and each box shrinks to its icon — a plug for the connection, a gauge for telemetry, a map pin for GNSS — with the same coloured dot beside it. Hover one for the full text.
- The
Statustab shows the Remote ID transmit rates the module itself schedules, per transport as Frames/s and Messages/s. In a healthy steady state expect Bluetooth 4 at ~10 frames/s, Bluetooth 5 Long Range at ~1 frame/s, Wi-Fi Beacon at ~5 frames/s and Wi-Fi NAN at ~2 frames/s (only while enabled — a disabled transport stays at zero). The Messages/s value grows as more of the broadcast content becomes available, e.g. once GNSS origin data arrives. - To verify the DRI broadcasts over the air we recommend the free Drone Scanner app (Android, iOS).
Receiver support differs per transport, see Broadcasting: Apple devices only receive Bluetooth 4. While connected to the module’s WiFi your phone is on channel 6, so an Android scanner app can verify the Wi-Fi Beacon transport on the same phone.